Cricket Renovations – The Basics; a few ideas
 The message is clear; skimp at your own peril, because neglect in the autumn renovation programme will mean inferior pitches the following season. Andy Mackay, Head Groundsman at Sussex CCC provides an in-depth guide to end of season renovations
There are some very basic aims when renovating a cricket square and these hold true no matter where the square, the standard of cricket played on it or the resources available:
– Clean the surface of any unwanted organic matter prior to topdressing
– Re-instate the sward and grass coverage with the desirable species
– Level the surface for the following season
… apart from that, anything else goes! There is no such thing as a standard renovation, so beware preconceptions about what you ‘should’ do.
Your aims, and how you get there are totally dependent on your square and your resources.
Take some time to examine your square and decide on the best way to approach renovations.
First, identify problems prior to renovations, then decide on an appropriate control method/approach
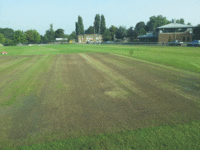
A visual examination of the surface is simply not good enough and you will need to remove cores in order to examine the soil profile and see what is underneath! If you do not have access to a corer, then use a knife to remove a slice of soil (though you really need to look a minimum of 100mm down). The three most common problems which should be targeted during renovations are:
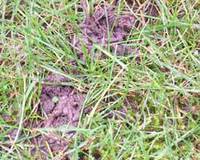
Common problems on cricket squares: 1) Thatch/fibre
Thatch is the number one contributor to low, slow wickets
Thatch is easy to control if the right techniques are applied
There should be NO thatch on a cricket square
Why is thatch such a bad thing on cricket squares?
– Deadens/reduces bounce and pace
– Soft and spongy surface

– Ball can ‘tear’ the surface or scar the surface leading to unpredictable bounce and ball direction
– Acts like a sponge, meaning a wetter square
– Can hold water and fertiliser at surface, meaning shallow rooting
– More prone to disease
– More prone to pest invasion
– Annual Meadowgrass (Poa annua) thrives in thatch
– Thatch = Poa and Poa = Thatch
– Topdressing over thatch leads to buried thatch and fibrous profile = even more spongy surface
– Buried thatch causes a weak point or organic layer in the soil profile, leading to the surface detaching from below when the prepared wicked dries and the soil shrinks, causing soil fracture in future years
What is Thatch?
– Thatch is a tightly intermingled layer of living and dead stems, leaves and roots which accumulates between the layer of actively growing grass and the soil underneath- Thatch accumulates when the production of dead organic matter exceeds the rate at which it decomposes
– Lignin is the biggest cause of thatch.
– Lignin is a tough, ‘woody’ type material which abounds in the older, tougher parts of the grass plant. It is also the main component of straw
– Leaf tips have low levels of lignin.
 – Some grasses cause more thatch than others: annual meadow grass is the number one culprit, ryegrass is comparatively good
– Unfortunately, on a square, there is a conflict between the needs of cricket and good turf management – the heavy, compact soil does not encourage thatch decomposition
– Therefore, cricket groundsmen rely heavily on mechanical removal
What is litter?
– Litter is the term often used to describe loose, dead organic matter found ‘littering’ the sward. In time, this will pack down and become thatch
– Litter is easily identified because close examination shows brown and yellow leaves lying amongst the living leaves
– This can be removed easily using a powered brush or verticutter
– Regular removal of litter is the best way to prevent thatch build up and reduces the amount of scarifying needed at the end of the season
What is Fibre?
– Fibre is an ambiguous term used to describe several different phenomena, however:
– Fibre is buried thatch and root material intermingled with the soil, sometimes known as matting
– Fibre drastically increases the organic content of the soil and makes it ‘spongy’
– Fibre is often said to resemble coconut matting
– Removing fibre needs heavy scarification using a powerful scarifier
How to help prevent thatch on a cricket square
 Don’t overfeed
Don’t over water
Do try to reduce annual meadow grass
Do mow regularly and box off
Do discourage other grasses and encourage Ryegrass
… but, really, a square relies on mechanical removal – scarifying, verticutting and brushing
Verticutting is a specialist and very light form of scarification carried out on fine sports turf areas, which raises loose vegetation at the base of the grass plant.
It should not be used to penetrate any underlying thatch layer, as severe defoliation of the sward can easily occur due to how closely spaced the verticutting tines are.
Verticutting in cricket is typically carried out on a bi-weekly basis when the grass plant is growing strongly throughout April to September.
The benefits of Verticutting:
– An improved sward density due to the encouragement of tillering
– A reduction in the potential for annual meadow grass invasion by producing a denser sward in the first place
– A reduction in the potential for disease attack
 – As a cultural control for, or assistance in controlling, weeds and coarse grasses
– To produce an upright grass prior to mowing, which will assist in giving a cleaner more even cut
– The playing speed of fine turf sports areas can be improved.
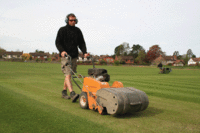
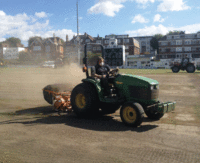
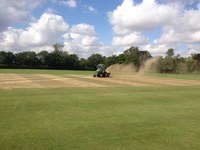
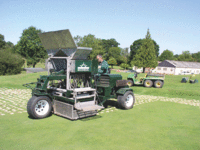
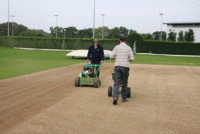
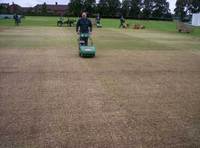
Scarifying is a process perhaps best described as a mechanical raking and is usually only carried out during end of season renovations or once a wicket is finished with for the year. Although its primary purpose is to remove thatch, it has associated benefits as well (linear aeration). A scarifier uses a series of sharp blades that rotate at high speed and cut into the turf in a vertical manner. Always scarify to a depth suitable to your square, i.e. to below the depth of thatch – in some squares 50mm may be necessary. In others, 5mm may be enough.
There are several different types of reel available depending on what type of machine you have but, in a nutshell, these are:
– Thatch removal reel
– Thatch control reel or verticutter
1mm thick blades for verticutting is ideal
2-3mm thick blades for scarifying
Koro Fieldtopmaker
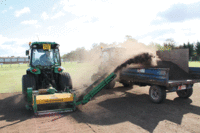 Is a revolutionary machine which has been available to the industry for about ten years. It is essentially a giant plane and can be used to strip off heavy thatch layers in one go, whereas previously this would take several years of scarifying. Caution should be used as Koroing removes all vegetation and so needs extensive re-sowing using a dimple seeder.
The machine can be used to fraize mow, whereby 4-5mm only is removed. This not only cleans out shallow thatch layers but also removes all weed grasses. Ryegrass will survive this process and so it is less invasive than Koroing.
How to scarify
– Aim to verticut regularly (bi-weekly) during the growing season
– End of season scarification aimed at removing everything except live grass and soil
– ‘Cleaning’ the surface up in preparation for seeding and topdressing
– Never scarify at right angles to the last pass as this can pull blocks up and severely disrupt the surface
– Scarify at a slight angle on each pass
– Work to below the thatch layer
 – If you have no seeder then use the scarifier grooves to get seed into the surface
– You can ‘kill a square with kindness’!
– Never prescribe a set number of passes. three passes may be enough, seven passes may not be
– Brush/clean up between passes and reduce grass height to 4 or 5mm
– If your scarifier doesn’t collect then you can use a mechanical brush, leaf blower or even mow the debris up
Thatch control in wicket renovation during the season
– As wickets come out of play, it is important that they be ‘tidied up’ before seeding and topdressing
– Verticutting slightly deeper than normal or using a thatch control reel is an excellent way of removing litter and dead grass from a used wicket
– Scarifying works too!
– Ideally, used wickets should also be brushed to make sure they are as clean as possible
 – If wickets are not being used again that season then scarification can be much deeper and thorough
– A lot depends on the nature of the square in question – some squares may crack excessively if deep scarification is done during the season and then they are allowed to dry out too much
Common problems on cricket squares: 2) soil breaks and fractures
What is this?
– This is where there is a horizontal weakness in the soil profile across a wicket at a consistent depth and can vary in severity from slight cracking to horizontal voids
– This problem is sometimes referred to as ‘root break’ or ‘layering’ and is a very common problem on older squares
– It can be very damaging to the performance of the square and also very difficult to overcome
It can be caused by a number of factors such as:
– Textural changes in the soil (usually caused by using incompatible topdressings from one year to the next). Different loams shrink and swell at different rates and to varying amounts so, if loams are not compatible, they will shrink apart during the drying of a wicket
– Compaction pans (often caused by ‘drum-type’ spikers which repeatedly work at the same depth, but can also be caused by rolling new squares with too heavy a roller too soon
– Construction breaks
– Burying thatch under topdressing
 – We can unwittingly create a soil break in just one year’s renovation if incorrect techniques are used – this is especially true if the wrong topdressing is used
– Identifying the syndrome can be difficult in the wetter months and may require cores to be dried out before it is manifest
Why is this a problem?
– As the ball impacts the surface, the energy from the ball is absorbed within the horizontal voids rather than being returned to the ball, leading to severely diminished bounce
– This break in the soil and the differences in loam mean that we can also end up with very clear points of moisture change between one level and the next. In a soil that is all the same, or changes gradually, the water would be present in a gradient, even if the top is dry and the bottom moist. This can lead to problems when we come to prepare our wickets
– If we are not very careful, when the roller is applied, it can produce a slight bow-wave in the soil and have the effect of severing the roots at the point of the soil fracture, if the soil is too moist on top, giving an even deader wicket in terms of pace and bounce
– If the top portion has reached a fairly dry state, but the soil below that is still relatively moist, the top of the wicket ‘snaps’ as the soil beneath the dry layer gives way under the weight of the roller. This manifests in very close together, regular cracking which can move when prodded with the foot or, indeed, a ball pitches; ultimately meaning an extra dead surface as even more energy is absorbed from the ball upon bouncing and also variable bounce
– Only becomes a problem when the break is buried below about 15mm
What can be done?
 – A good, deep root structure will help to bind the soil together and diminish the effects of a soil break, so aim to get a dense sward with the right grasses; annual meadow grass is a very shallow rooting plant in cricket squares
– Be careful not to roll when the soil is too moist
– If possible, spike before topdressing
– Always make sure there is a ‘key’ for new topdressing, either with scarifying grooves, seeder holes or spiker holes
– Ensure that the same topdressing is used each year. Any changes to topdressing should be done gradually over a number of year by mixing the new topdressing with the old in increasing quantities
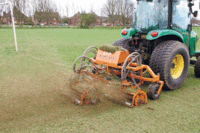
– Regular spiking out of season at different depths will not only improve root depth, but also physically mix layers up and destroy compaction pans
– Hollow coring can be effective, if followed by topdressing, as the new loam will ameliorate the soil and also physically pin the two layers together. However, caution must be used as this can lead to a ‘dimpled’ surface the following year and/or leave hollows at the bottom of the core, since topdressing will often stick in the hole without reaching the bottom. If hollow coring is carried out, you should not core any deeper than necessary (a few mm below the soil break) and, as a rule of thumb, never more than a couple of inches
 – Drill n Fill. This is a machine that drills out holes on a grid pattern. It is useful since it does not have any heave and so will not disturb the surface of ‘weak’ squares. Furthermore, the holes it makes are much bigger than hollow cores and, so, more soil is being ameliorated in one go. The technique is to drill, clean up the spoil and then ram topdressing down the holes. In order to do this satisfactorily, the holes need to be physically packed down and then more loam applied – for this reason, it is very time consuming and just not possible for most squares.
Common problems on cricket squares: 3) Thin sward and moss invasion
These have been lumped together because they should be targeted with the same methods during renovations. Thin grass and moss go hand in hand. If you regularly suffer from moss invasion, there may be an underlying cause.
The best time of year to deal with moss and get a good grass cover is during the autumn renovations, i.e. before the problem occurs!
Moss is the symptom of poor grass growth rather than the cause of it, and a healthy, dense sward will keep moss at bay.
Tips for avoiding moss:
1) Get a good sward
– Ensure a good seed pattern during renovations. The best method is to use a dimple seeder and make many passes but, if this is not possible, use scarifier grooves, even applying seed in between scarifier passes whilst the slits are open, since only a small proportion of the seed will be picked up in subsequent passes. The seed must be in good contact with the soil or it will not grow
 – Relying on spiker holes alone will give a sparse coverage
– Aim to apply a minimum of 50g/m2 of dwarf perennial ryegrass unless your square is well grassed anyway
– Unless you have a specific ph issue, use 100% summer ryegrass mixes. Studies have found that, in traditional fescue/bent/rye combinations, only the ryegrasses thrive in compact conditions and are often the only species to germinate at all in reliable numbers
– Aim to complete all renovations by the end of October at the absolute latest, and preferably sooner. Ryegrass needs a soil temperature of above 5.5OC in order to germinate and frost will kill young grassplants
– Apply a suitable pre-seeder fertiliser.
– Water the seed if necessary and keep moist until the plants have established
– Regular mowing when the grass is growing will maintain the sward health. Certainly do not allow the sward to grow above 25mm when established or else there will be a loss in density
 – Feed through the winter months too! Grass needs much less nitrogen through the winter months, but that does not mean that it needs none. Applying a low nitrogen feed, which is high in potassium, will help the grass plant recover from damage and stress and keep red thread at bay. If this fertiliser has iron in it, so much the better as this will harden the sward and the iron will also scorch moss.
2) Check pH
– Have an annual or even bi-annual soil analysis done
– Aim to maintain a pH of between 6 – 7, 6.5 being the agronomic ideal for Ryegrasses.
– Acidic soils encourage certain types of moss
– Excess acidity or alkalinity can affect the availability of nutrients. If there is a shortage of certain nutrients (especially N, P and K), then the grass will not prosper and moss will infiltrate
– If you do need to adjust the pH on a square, you should seek expert advice as a number of products are available to do this. However, changing the pH on a square should be done SLOWLY and gradually, in most cases, as the structure of a cricket soil and/or the way it behaves can be disturbed during the process
3) Control worms
– Each worm cast is a bare-patch that, if not colonised by a weed or weed grass, will invariably become a home to moss
– Use a suitable worm suppressant chemical at the times of the year when worms are most active in producing casts, but always before topdressing, as there is nothing worse than going out to cut a freshly seeded square for the first time and smearing a load of worm casts all over the place
– Switch or brush regularly to disperse casts, especially prior to mowing
4) Reduce moisture
– Moss spores spread and thrive in wet conditions
– Consider reducing the height of cut to around 15mm to 20mm throughout winter. Although leaving the grass plants longer will encourage deeper rooting, there is also less air movement through the sward, meaning that the grass stays wet for longer and moss and disease will have a greater opportunity to spread
– Spike regularly to improve drainage
Renovation techniques:
If we return to our renovation aims from earlier:
– Clean the surface of any unwanted organic matter prior to topdressing
– Re-instate the sward and grass coverage with the desirable species
– Level the surface for the following season
We must recognise that there are fairly simple and common ways of achieving the above, which most cricket groundsmen will undertake as a matter of course, combined with any specific measures being undertaken to combat a specific issue/problem on their particular square.
 These are, but are by no means limited to:
1) Clean the surface up. Usually done by mechanical raking/scarifying in multiple directions (three light passes is a minimum where no thatch exists) and reducing the height of the sward to c.5mm, brushing etc.
2) Deeper passes may be required with the scarifier in order to remove thatch/fibre, though it is good practice to make at least one deep pass (10mm or more) as this will help control fibre and also provide an even better key for the new loam and seed
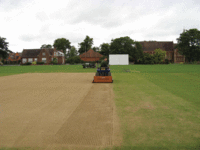
3) Re-instate the sward by applying seed – dimple seeders are the most superior method for cricket squares if you have one, though, if not, you should use the scarifier grooves
4) Spike (if possible)
5) Apply a worm suppressant
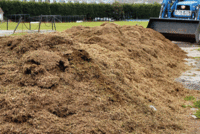
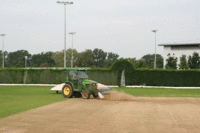
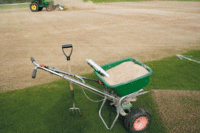
6) Level the surface by topdressing using suitable cricket loam (generally between 100-200kg per wicket). This should then be worked in using a lute or drag mat (though ladders dragged behind a vehicle are also sometimes used), careful attention being paid to levels at this stage
7) Apply pre-seeder fertiliser; I always do this last so as not to disturb the spread pattern with luting etc., though you can only do this if you are sure the loam will be dry enough to walk on – otherwise do it before topdressing. Something like an 8:12:8 or even a 7:7:7 at 35g/m2 will be ideal, though you should be careful not to use anything with iron in at this stage as it can acidify the surface and damage new grassplants. The point here is to supply the grass with everything it might need to start a happy and healthy life. We can assume, under normal circumstances, that there is enough of everything in the soil apart from N, P and K. Phosphate, in particular, is very immobile in clay soils and so, even if soil testing has revealed that there is ample, for the purposes of re-seeding it is always safer to apply it at this point
8) Irrigate if necessary. It is important that the seed does not dry out and that it is supplied with enough moisture (on a regular basis) until the root system is established
 9) First cut should be when the grass plant is at the ‘2-leaf stage’ or about 30mm high. The first cut should be set to just top off the grass and then the height can be gradually lowered over the next couple of weeks
It should be noted that some First Class cricket grounds topdress later in the year when the new seed has established, however, it is more difficult to pick the right weather for this.
Some common mistakes/things to avoid:
– Scarifying at right angles to previous passes can lead to blocks being pulled out of the square, known as ‘cubing’. Scarifying passes should be made at acute angles to each other
– Not scarifying enough. Leaving thatch on the surface. Topdressing on top of thatch. Prior to topdressing, you should be left with only live grass plants and clean soil
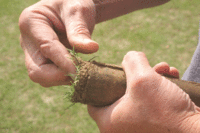
– Changing loams/using loam from an unreliable source. If loams aren’t compatible, they will shrink at different rates during the drying process and create problems for the future (see ‘Soil breaks/fractures’ above). To check a loam’s compatibility, make some motties out of the old stuff or straight from your square and also some from the new material. Cut them in half and join one old half with one new.
Compatible loams will not shrink/crack apart when drying and should display no particular tendency to break at the join under pressure
– Not using enough seed. This leads to a thin sward which will have a tendency to produce large crowns the following year, produce lots of lateral growth and allow the invasion of weed grasses, weeds and moss
– Failing to irrigate when necessary (as above)
– Just topdressing the ends. This is common practice where budgets are stretched, however, care should be taken not to build up levels too much and, over the years, this practice creates ‘saddling’ on a square. If you can only afford to topdress the ends, then be measly with how much you use, and try at least to pick over the rest of the square and repair any obvious hollows or scars
– Not levelling the ends properly. If the ends sit low going into winter, then they will tend to hold water and germination may be severely reduced in these areas. Always level your ends prior to topdressing
– Using too much seed/fertiliser – not a common problem, but using too much seed or fertiliser can lead to damping off and disease damage
– Not following up with regular winter work. Abandoning the square post renovations will only lead to tears the following season. Besides, operations such as mowing the square on a crisp winter’s afternoon is good for the soul!
I hope this has been useful to you.
Best wishes
Andy Mackay, Head Groundsman, Sussex County Cricket Club