By Editor in Cricket on 9th Jul 2008 14:00
ECB Cricket Pitch Advisor, Gordon Gill, gives us his take on repairing bowler footmarks and damage to the crease, whilst Mark Jolliffe, Head Groundsman at Taunton School, provides a pictorial explanation of the three methods he uses to cope with the various situations he encounters during the season
There are several types of bowler foot mark/hole/crease damage that will need attention/repair during a normal cricket season.
Should a bowler dig a hole deep enough that it requires attention during a game, the following method is the one that I use.
First, sweep all rubbish out of the hole.
Second, just dampen the bottom and sides of the hole with water, and I mean just dampen.
Thirdly, fill the hole with damp loam, fill it as high as it is deep.
Fourthly, gently firm the soil with your foot, starting around the edge and finally on the top.
Next, lay an old plastic loam bag on the repair and, using what I call a thumper, thump down on the repair several times until the repair is level with the surrounding area. Brush some dry dust from the area over the repair and remark the crease. Very often, players will not even realise that a repair has been carried out. This repair will very often be carried out during a lunch or tea interval as well as at the end or beginning of a day’s play.
There are, however, one or two very important points to remember when carrying out this repair. Never make the hole too wet. You should not have any standing water in the bottom of the hole. Even more important, do not have your loam to wet. To get your loam to the right consistency will take a little practice, but the secret is to only add a very small amount of water to your dry loam as you mix it.
Take a bucket and put in two or three good handfuls of dry loam. Apply a splash of water and thoroughly mix/knead using your hands. Keep doing this until the loam in your bucket still looks dry, but that when you squeeze a handful in the palm of your hand it just stays together and does not fall apart.
When filling the hole, you must put enough soil in and heap it to the right level. If, after thumping, the level of the soil goes below the level of the surrounding area, that is where it will have to stay. You cannot successfully top that repair up and level it off. The soil will more than likely separate at the join. If you fill the hole and there is standing water in the bottom, that water will rise through the soil to the top during thumping, leaving you with a wet pudding that will not dry and will be a danger to any bowler who stands on it.
A different technique is used when a wicket has been taken out of play. In this situation I carry out the following.
Brush all rubbish from holes and the area to be repaired. Fill the holes with water and allow to soak away.
It may be the next day before you can continue with the repair but, once the water has gone, get a fork and fork deeply into the holes giving the fork a good wiggle back and forth. If you have a very wide deep hole, you may have to carry this out several times. This will create big holes and bring the base of the hole nearer to the surface. You can then pour dry loam down the holes. Fill to about surface level and firm with your foot.
Using a rake, then loosen the surface of the soil, apply a generous helping of seed, at least one handful per sq.yd. and, finally, apply more loam and level off the whole area with a wide straight edge, at least six to eight feet wide. Cover ends with a germination sheet and thoroughly water. Keep damp and the seed should germinate within five to seven days.
Another technique is very similar to the above and very useful if you do not have deep holes. Irrigate both batting ends thoroughly. When soaked in, make thousands of holes by using a sarrel roller in several directions. Apply a generous helping of seed, lightly topdress the whole area, again using a long straight edge to level off. Cover and keep well watered. Again, the seed should be germinating within five to seven days.
If you have both the time and the equipment, then you can repair the whole of the wicket at the same time as repairing the ends.
Brush all rubbish from the ends. Irrigate the whole length of the wicket and allow water to soak away. Then use a tractor mounted spiked roller/seeder. Make two or three passes of the wicket, before broadcast seeding through a cyclone type spreader and brush in with a drag brush. Do this two or three times before finally levelling off the ends and applying a couple of bags of loam, again with the cyclone, down the length of the wicket and drag brushing in. The drag brush pulls both the seed and loam into all the little holes, giving good seed to soil contact. Then lay a full length germination sheet and thoroughly water. Again, germination will usually take place within five to seven days.
This last method can be carried out using a sarrel roller, but it will be hard work.
If you cannot cover the full length of the wicket you will have to regularly water it to keep the seed moist and prevent it from drying out. To aid germination I know that some groundsmen use wetting agents to keep both the soil and the seed moist. If germination sheets are not available, old hessian sacking is very useful. This can now be bought at many builders merchants, as bricklayers often use it to protect newly laid bricks from frost.
Whichever method of repair is undertaken, there are one or two golden rules that must be adhered to. Never use more loam than is required when repairing ends. It is far better, in my opinion, for the repair to settle a little low than too high. It is very difficult to reduce the height of a repair, it is much easier to add a little loam to achieve level than to take loam away. Every saddle end has been caused through poor repair of ends by adding more loam than has been required.
Finally, to successfully repair worn ends, you must achieve good seed to soil contact and keep well watered, especially as the seed germinates. If a newly germinated seed is allowed to dry out, then that plant has died, end of story.
Too often I get asked how to make ends grow as many clubs seem to struggle, only to find out that not enough water is applied, often enough.
There is no hard and fast method to repairing ends. I have explained how I carry out repairs and, I like to think, successfully. Many others will have their own ways and ideas. The end result is what matters. What I will say though, is, a square with level repaired ends, even if not perfect, looks far more presentable than a square with unrepaired pot holes all down the ends. You are more likely to play when ground conditions are poor if the ends have been repaired than if pot holes are full of water.
The Taunton methods …
Method 1: When looking for a repair for a quick turnaround (e.g. for second day’s play):
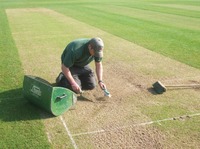 1. Clean up pitch, particularly the ends using stiff brush and dustpan and brush to remove all loose debris. Inspect for studs. 1. Clean up pitch, particularly the ends using stiff brush and dustpan and brush to remove all loose debris. Inspect for studs. | |||||||
| 2. Brush pitch and cut at playing height (3-6mm). | |||||||
| 3. Dampen footholds and bat marks with a spray of water. | |||||||
4. Use a sharp pronged fork to spike holes in dampened holes. This is to help new loam to key in.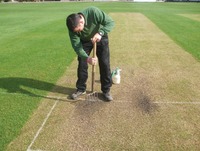 | |||||||
5. Mix up compatible loam with water in a bucket to a plasticine consistency. 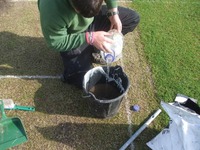 | |||||||
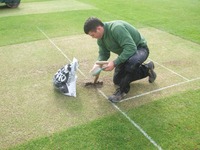
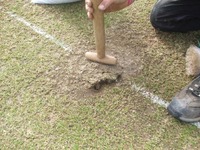
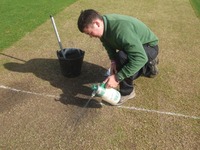 6. Using an old plastic scoreboard number, or the like, push, work in and smooth the loam mix into the holes using water sprayed from a mister to keep the mixture pliable and the plastic number wet to stop the mixture sticking to it. Do not make the repair too wet otherwise you’ll end up with a mud bath. 6. Using an old plastic scoreboard number, or the like, push, work in and smooth the loam mix into the holes using water sprayed from a mister to keep the mixture pliable and the plastic number wet to stop the mixture sticking to it. Do not make the repair too wet otherwise you’ll end up with a mud bath. | |||||||
7. Continue to firm in and smooth loam until desired fill is achieved. Ensure edges of the repairs are damp and not dry.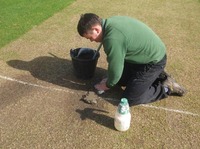 | |||||||
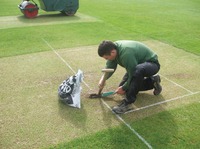
| 8. Repeat in other holes. | |||||||
9. Allow repairs to dry a little (about half an hour depending on conditions), then lightly cover repairs with fresh grass clippings and push down gently by foot. This is to prevent rapid evaporation and subsequent cracking of the repairs. It also prevents the roller picking up the damp loam.
|


Method 2: When needing a repair for a fast turnaround:
1. Follow 1, 2 and 3 above.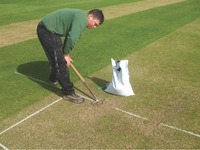 | |
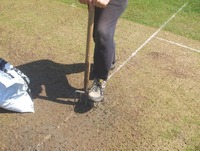
 2. Using the sharp pronged fork, at the edges of each hole, gently work the fork into the ground at an angle towards the centre of the hole. Once the prongs are about 10cm into the ground, gently lever up the ground to reveal a void beneath. 2. Using the sharp pronged fork, at the edges of each hole, gently work the fork into the ground at an angle towards the centre of the hole. Once the prongs are about 10cm into the ground, gently lever up the ground to reveal a void beneath. | |
 3. Using compatible, dry loam, brush it into the void underneath and work in with the help of the fork. 3. Using compatible, dry loam, brush it into the void underneath and work in with the help of the fork. | |
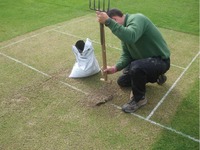 4. Once enough loam has been introduced, gently firm the ground back down under foot. Spray lightly with water and use your foot/tamper to firmly re-consolidate the ground level. Ensure the ground fractures have been sealed over using water from a mister, perhaps with a little loam to help. 4. Once enough loam has been introduced, gently firm the ground back down under foot. Spray lightly with water and use your foot/tamper to firmly re-consolidate the ground level. Ensure the ground fractures have been sealed over using water from a mister, perhaps with a little loam to help. | |
| 5. Repeat as necessary for all the other holes. Avoid over filling the voids with loam otherwise you will end up with proud humps. Roll pitch as necessary. | |
 6. Re-mark lines as normal – dampen the lines with a mister beforehand if ground is dusty/dry. 6. Re-mark lines as normal – dampen the lines with a mister beforehand if ground is dusty/dry. |
Method 3: This method is used for retiring a pitch for use later in the season or for end of season.
1. Follow Method 1, steps 1 and 2.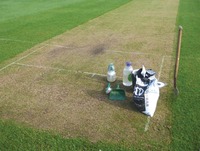 | |
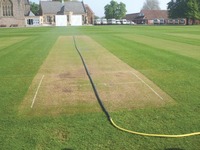 2. Using a pitch length perforated hose, soak the pitch thoroughly for half an hour or so to soften the surface to take a sarrel spiker. 2. Using a pitch length perforated hose, soak the pitch thoroughly for half an hour or so to soften the surface to take a sarrel spiker. | |
 3. Allow the pitch to dry a while and then run the sarrel spiker over the entire pitch to open it up. Manually fork holes into footholes to aid keying in of loam. 3. Allow the pitch to dry a while and then run the sarrel spiker over the entire pitch to open it up. Manually fork holes into footholes to aid keying in of loam. | |
 4. Using dry, compatible loam and square seed mixed in, spread loam mix into all holes and worn areas and thoroughly work in using a tru-lute, rough side down. 4. Using dry, compatible loam and square seed mixed in, spread loam mix into all holes and worn areas and thoroughly work in using a tru-lute, rough side down. | |
 5. Spread square seed along length of pitch and also a light application of appropriate fine turf fertiliser. 5. Spread square seed along length of pitch and also a light application of appropriate fine turf fertiliser. | |
| 6. Apply by hand a light dusting of compatible loam along the length of the pitch and gently lute and water in. | |
 7. If square usage allows, lay down a full length germination sheet, remembering to check underneath every day for disease, particularly during humid/damp weather conditions. 7. If square usage allows, lay down a full length germination sheet, remembering to check underneath every day for disease, particularly during humid/damp weather conditions. | |
8. Ensure the pitch is kept damp as you do not want the seed to dry out, but don’t over water. 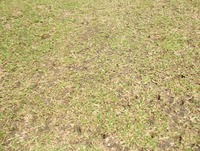 | |
| 9. Remove sheet once seed has germinated. | |
 10. The pitch will be ready to use again later in the season but, next time, less preparation will be required as a good level of consolidation will be present with a nicely thinned sward. 10. The pitch will be ready to use again later in the season but, next time, less preparation will be required as a good level of consolidation will be present with a nicely thinned sward. |