From the June Edition of Pitchcare –
By Editor in Cricket on 10th Jun 2008 12:00
Cricket pitch preparations can take anything from 5-15 days.Every Groundsman’s preparations will be different. No two pitches are the same and neither is the equipment each Groundsman has available.
Some clubs have covering systems whilst others don’t. This will have a major bearing on pitch preparations.
The size and weight of rollers will also dictate what can be achieved. Clubs who only have part time and/or volunteer labour may be restricted in the time they have to prepare their tracks.
The following extract is taken from the TS4 ECB Recommended Guidelines for the Construction, preparation and maintenance of cricket pitches and outfields at all levels of the game.
The booklet can be downloaded from the ECB website. TS4 Booklet
When the fixture list is available it is possible to establish a plan to programme pitch allocation for the whole season.
You should aim to produce equal usage of each pitch. It will be necessary to place the more important fixtures towards the centre of the square and then work out accordingly.
Consecutive matches should not follow on adjacent pitches as this could mean using a strip which may be damaged from the bowlers run-off from the previous match. The two outside pitches are often reserved for junior games or practice/artificial pitches.
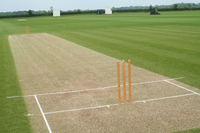
To facilitate this, the table should be ‘squared off’ prior to the playing season, using the 3-4-5 triangle method to establish the corners, stump lines and individual pitches set out with white ‘T’ markings.
Pitch Preparation Prior to a Match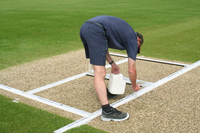
For first class pitches, this should, ideally, commence at least 10-14 days prior to the match or, in the case of clubs, schools etc., a minimum of five days before the match.
Select the pitch to be used, outlined by ‘T’ marks to a width of 3.05 metres, preferably using strings, and mow, ideally using a mower with a thin bottom blade and having at least an 8-bladed cylinder set to a height just lower than the rest of the square (eg. 6mm). Cut along the line of the pitch and return on the same line you have just cut.
Work your way across the pitch to complete the full width. Dependant on how much grass is present on the surface it may be necessary to repeat this operation.
Scarification should be carried out between the popping creases to reduce the density of grass, using pedestrian or mechanical brush/rake machinery (not thatch removal or similar type tines), hand rake or a strong broom, care being taken not to disturb the soil surface.
The bowling ends should not be scarified as this will assist in reducing the wear and tear, and aid recovery from the damage caused by players. Scarification should continue until the grass sward has been sufficiently reduced in density. There should be no mat of grass and the surface soil should be visible between the blades of grass.
Check for small scars or depressions, particularly on a length, and repair where necessary. (Carefully lever up depressions. Do not simply fill hollows with loose soil as they would only disintegrate if struck by the ball).
If the surface is dry, it is generally considered that water, either by rain or applied by irrigation, is essential in the preparation of a pitch in order to give it a firmer, solid surface for match play. Water copiously, if necessary, with the aim to soak the profile to a depth of 75-100mm.
There is no fixed period for the watering of a pitch, but this should be done well in advance of a match in order to ensure that the pitch is completely dry at the start of play. Ideally, this should start no less than ten days prior to the match.
The rolling of the pitch should commence with a light roller when all surface water has disappeared. As the pitch dries, the weight of the roller should increase.
The Groundsman should use the heavy roller at every suitable opportunity prior to a match whilst any moisture content remains. The heavy roller should not be used once all the moisture has gone from the pitch.
In prevailing hot, dry weather conditions it may be necessary for further light irrigation or ‘flashing’ nearer the match day, although such a decision would rely on the experience and expertise of the groundstaff, as is the deployment of covers, where provided, to prevent unwanted wetting of the surface or to control the rate of drying during the course of preparation.
If the square has been consolidated before the season, pitch preparation is greatly assisted and possible rolling times reduced.
For the remaining pre-match days during the course of preparation, mow every day, or at least every other day, between the popping creases and, in 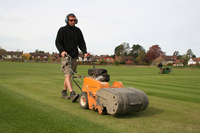 combination with light scarification/brushing, progressively lower the cylinder to the desired height of cut (typically between 3-5mm), or as low as possible without scalping and ensuring the surface is not scarred or disturbed in any way.
On the morning of the match, start early and brush, close mow and roll (typically for around 15-20 minutes). Finally, if not done the previous day, mark out the creases on the pitch, clearly, accurately and neatly with lines not more than 25mm wide nor less than 12mm using string lines or a marking frame if available. Use a proprietary marking compound or whiting powder or combination of both.
Finally, before setting the stumps in the correct positions on the crease, place a little water in the stump holes. This will ensure that the stumps remain firmly in place for the duration of the game.
At the start of the match the pitch should be completely dry and should not be excessively green in colour to favour sideways seam movement. This should not only apply to the top surface but also progressively to a depth of 75-100mm. Weather conditions may make this difficult but, if the weather is fine, or with the correct use of covers, it should usually be possible to obtain complete dryness. A pitch which is completely dry at the start is more likely to assist spin bowlers later in a game.
A pitch prepared in the above manner should, given good ground and weather conditions, be expected to last for 3-5 days of first class or 3-4 games of average club standard.
Pitchcare method men…
Tonbridge School
Cricket Pitch Preparation at Tonbridge School
George Alexander explains the regime he uses at Tonbridge School. This schedule is for early season when no watering would be required.
The square is maintained at a height of 15mm all year round. All 15 pitches are pre-marked at 10ft intervals on the square. Pitch preparation starts 16 days before the pitch is required.
Day 1 (Thursday) First cut is done with a Lloyds Paladin, set at 10mm, using string lines for an accurate 10ft playing area. Light scarification using a Sisis Combi Rake (to reduce the density of the grass cover) only between popping creases. A second cut at 10mm. 30 minutes rolling using Autoguide roller (am). Full 26yd length of the pitch is always rolled. Further 30 minutes rolling (pm).
Day 2 2 x 30 minutes rolling sessions. am and pm.
Day 3 Cut at 10mm.
Day 4 (Sunday) Rest day, even for Groundsmen
Day 5 Cut at 10mm, light scarification, cut at 10mm and 2 x 30 min rolling sessions.
The pitch will now be covered, when necessary, to keep all rainfall off the playing surface.
Day 6 Cut at 8mm, light scarification (by this stage I would expect enough grass will be thinned out to leave around an 80% grass cover). Soil should be visible. Cut at 8mm, 2 x 30 min rolling sessions am and pm.
Day 7 2 x 30 min rolling sessions.
Day 8 Cut at 8mm, 2 x 30 min rolling sessions.
Day 9 2 x 30 min rolling sessions.
Day 10 (Saturday) Cut at 8mm.
Day 11 Rest Day
Day 12 Cut at 8mm, 2 x 30 min rolling sessions.
Day 13 Cut at 4mm using Allett Shaver, second cut at 4mm, 2 x 30 min rolling sessions. Pitch creases will be dashed-out (4 x 50mm dashes per line), stump holes made. Careful examination of the surface to determine if a light sprinkle of water is required before rolling.
Day 14 Cut at 4mm, 2 x 30 min rolling sessions.
Day 15 Cut at 4mm, 2 x 30 min rolling sessions
Day 16 (Friday), Cut at 4mm, 2 x 30 min rolling sessions. Fully mark creases and water stump holes. The pitch is now ready for play should any problems occur on Saturday morning.
Day 17 (Match day) Cut at 4mm between the creases, quick 20 min roll at around 10am (let the players see the pitch has been rolled before the coin toss). Set out the stumps and hope they get around 250 runs in each innings.
In the event of the square drying out before the start of the season, heavy watering before and during preparations is the one change to the above process.
Tips Try bouncing a cricket ball on the pitch each morning. Over the preparation period the vertical bounce should gradually get higher. It is also a good indicator of the pace of the pitch.
The bounce will get higher as the season progresses and as the soil profile dries out.
Buy a soil sampler. Take out a plug at the start of the preparation programme. Do this in the middle of the pitch, 8 inches in from the edge. No ball will ever pitch there. Log the soil characteristics, i.e, dampness, any breaks etc. The day before the match take a second sample from nearby and compare. Have a look at what’s happening beneath the surface. Do this all season – it’s addictive!
Do not keep lowering the height of cut, especially if the pitch is to be used over consecutive weekends. The grass will struggle to recover if this is done.
Weston-super-Mare Cricket Club
Cricket Pitch Preparations at Weston-super-Mare CC
Grounds Manager, Jon Lawrence, outlines the work he undertakes to prepare his wickets
Day1 Brush track to lift grass leaf. Cut track to 8mm. Flood track (half inch covering) and once surface water has soaked in cover with flat sheets.
Day 2 Brush track to lift grass leaf. Cut track to 8mm. Flood track (half inch covering) and once surface water has soaked in cover with flat sheets.
Day 3 Scarify track with lawnman. Brush track to lift grass leaf. Cut track to 8mm. Leave flat sheets on surface.
Day 4 Brush track to lift grass leaf. Cut track to 6mm. Remove flat sheets and carry out rolling as required.
Day 5 Brush track to lift grass leaf. Cut track to 6mm. Remove flat sheets and carry out rolling as required.
Day 6 Brush track to lift grass leaf. Cut track to 6mm. Remove flat sheets and carry out rolling as required.
Day 7 Brush track to lift grass leaf. Cut track to 6mm. Remove flat sheets and start drying out the upper part of the track.
Day 8 Brush track to lift grass leaf. Cut track to 6mm. Roll as conditions allow. Continue drying process. Use Roll on and roll off covers to control the drying rate as required.
Day 9 Brush track to lift grass leaf. Cut track to 6mm Roll as conditions allow. Continue drying process.
Day 10 Brush track to lift grass leaf. Cut track to 6mm Roll as conditions allow. Continue drying process.
Day 11 Brush track to lift grass leaf. Cut track to 6mm. Roll as conditions allow. Continue drying process.
Day 12 Brush track to lift grass leaf. Cut track to 6mm. Roll as conditions allow. Continue drying process.
Day 13 Brush track to lift grass leaf. Cut track to playing height (4 or 5 mm depending on time of year). Cut out with scissors any stubborn stems which won’t stand up for cutting. Roll as conditions allow. Continue drying process. Cover track overnight.
Day 14 Brush track to lift grass leaf. Cut to playing height. Roll as conditions allow. Cover track overnight.
Day 15 – Match day Brush track to lift grass leaf. Cut at playing height. Final roll to make track look nice. Mark out track.
Rolling is only necessary until the desired consolidation levels are achieved. Rolling is done in 30 minute intervals, ie 30 minutes rolling and 30 minutes rest.
Roll on and roll off covers should ideally be used every night from match day 8 onwards.
Obviously everything is very weather dependent. If the track is dusting it may be necessary to mist it prior to rolling on day 14, remembering that you don’t artificially water after lunchtime on that day – though I don’t consider misting the track as watering.
TIP: Presentation is important. Don’t be frightened of getting on your hands and knees to cut out stubborn bits of grass.
St Paul‘s School, London
Head Groundsman, Neil Dixon, gives a brief outline of the ten day preparation regime he uses for his 1st XI fixtures at St Paul’s School.
This programme is very weather dependent, of course, but I hope it gives a brief insight into how we prepare our cricket pitches.
Day 1 Cut whole square at 13mm. Cut out pitch to be used at 10mm using a Dennis verticut reel the pitch is verticut to remove the bulk of lateral growth. Pitch is then cut again at 10mm, heavily irrigated, normally 2 or 3 times in one day, and then covered overnight.
Day 2 Pitch will hopefully be ready for rolling. If so, it is rolled for approx 20-30 minutes, then re-covered. This is done approximately every 3 hours, about 25-30 minutes rolling at a time.
Day 3 The square is cut at 13mm, the pitch at 9mm and, again, more rolling and covering during the day.
Day 4 More rolling and covering. I may look to give the surface a light water if I feel it is needed
Day 5 Square is cut at 13mm. Hopefully, now the ground will be firm. If so, I use a Sisis hand rake to remove any lateral growth, along with cutting and rolling – I never roll for more than 20 – 30 minutes at any one time.
Day 6 Now the wicket is left open to the elements a bit more to help the drying of the pitch, along with more frequent but shorter rolling – 10-20 minutes only
Day 7 Square is cut at 13mm. Pitch is cut at 9mm, and brushed/raked with the Sisis combi rake to stand the grass up and remove any material from the surface. The pitch will be monitored to prevent it drying too quickly, and covered if needed.
Day 8 More rolling and covering throughout the day.
Day 9 Pitch is cut at match height of 4mm and rolled.
Day 10 – Match Day Square is cut at 13mm. Pitch is cut, rolled, marked out and now covered until the fixture.
Wearmouth Colliery Welfare Ground
Wearmouth Colliery Welfare Ground – Head Groundsman, Jon Buddington

I have 14 pitches on the mainly Mendip loam square. This was heavily thatched and full of broad leaved weeds when I arrived 28 months ago.
There are severe saddles that have built up over 100 years of play. The soil profile is 50mm of loam and then a 25mm layer of medium clay loam followed by clinker and ash. Not ideal for pace!
I have recently been able to purchase a hose which enables me to water the square. I have in the region of 55-60 fixtures and extra cup games a season.
Initial preparations will be a longer job than in the middle of the season. Considering that I have uncovered wickets here, water is also at a premium, as the water tap, on mains pressure, is 150 yards away.
I just do not have the time to water to a depth with a trickle – or prepare as a covered wicket. No covers or sheets are available to me.
Removing moisture and consolidation are key components when preparing a pitch.
Worm casts, and surface disturbance must be eradicated before the square dries out as, once the depth has been consolidated, then that’s it until rain aids me. I just don’t have the pressure or volume of water available to me.
About 8-10 days out from the game I mark the strip with cord and pins, then do an initial cut to 8mm. Once I am happy that the first cut is straight and ‘bang on’ I verticut, using the Sisis thatch control (triangular blades) just flicking through the sward. If the strip is slightly damp I can go just a little deeper. I continue to cut the strip at the same height during this period.
I now use the drag brush and weigh it down with a couple of bags of loam, down the strip and back on myself. Again, I initially cut at the same height. I normally let the sward dry out and then reduce the height accordingly through a period of 3-4 days. I have never had a set height of cut for the final finish. As long as I am not scalping the surface I continue to reduce the height of cut.
Rolling will be little and often during the days prior to the match, especially when there is a dew present, which aids ‘polishing’ the strip. Twenty minute bursts with the Autoroller is my usual practice. The pitches should be consolidated before individual pitch preparation.
Top Ten Tips
Geoff Calcot, ECB Pitch Adviser
1) Do the RIGHT things at the RIGHT time with the RIGHT equipment.
2) I always apply a worm repellant mid-Feb/early March – nothing worse than the familiar splat of a flattened wormcast.
3) Have your soil tested on at least an annual basis. Take note of the findings and tailor your fertiliser programme accordingly. Remember the optimum ph for dwarf perennial ryegrass is 6.5.
4) Square the square up and try to keep the corners in place permanently – it can save an awful lot of time.
5) Prior to instigating the spring rolling programme, toughen the sward with an application of liquid iron or an application of Autumn/Winter fertiliser.
6) Ensure that your machinery is all in good working order.
7) Order your supply of seed, fertiliser and loam, enough to last you through the playing season.
8) Don’t bother to overseed any bare/thinly populated areas on the square until the pre-season rolling has taken place.
9) Consider adopting a pitch preparation programme which commences around 10-14 days in advance of the actual game.
10) Remember that, early season, you would probably only wish to take the mower height down to 5mm for the match cut, but once the season is in full swing take it down a further millimetre or two.